Hello loves, it's Bear!
It's been a while since I have posted on this blog, for which I sincerely apologize. As a ninth grader, I have recently been dealing with an increased workload, and although I enjoy blogging about my various interests in beauty and crafts, I will always put academics first. My dream is to study neurobiology at Cambridge University, which I will not be able to accomplish if I don't put effort into my work.
However, I have decided to try to dedicate my weekends to posting on this blog, and will try to post twice a month. I have additionally decided to post things correlating to some of my other passions, such as book reviews, which can be connected to my affinity for literature. I will additionally try to provide further scientific information on the methods used in my DIY beauty remedies.
I am uncertain as to whether anybody is actually going to read this, I don't have a large following, and I am fully aware of that, however, I am planning on putting as much effort as I can into my upcoming posts.
Whoever you are, I wish you a lovely 2017!
Love,
Bear
Sunday, January 1, 2017
Tuesday, August 2, 2016
How to Knit using a Wide Toothed Comb + Headband Tutorial
Hello everybody, it's Bear! In today's post I will show you how to knit with a wide toothed comb. I will also be showing you how to knit a headband using the technique you will learn in this post!
This is preposterously easy to do and despite being rather time taking, is perfect for times when you have a loads of time on your hands and are uncertain as to what you want to do with it (such as when you're on a field trip and want to read yet are unable to due to the fact that getting carsick isn't fun ).
You can create various items using this technique! This technique can also be used to keep young children occupied, thus making it a perfect babysitting activity!


What you'll need:


To make a headband, cut off the excess yarn and stitch each side to a piece of elastic ribbon.


This is preposterously easy to do and despite being rather time taking, is perfect for times when you have a loads of time on your hands and are uncertain as to what you want to do with it (such as when you're on a field trip and want to read yet are unable to due to the fact that getting carsick isn't fun ).
You can create various items using this technique! This technique can also be used to keep young children occupied, thus making it a perfect babysitting activity!

What you'll need:
- A wide toothed comb
- Yarn of your choice
- Hands (preferably with fingers)
- Patience (or Netflix)
Step 1. Tie a slipknot.

Step 2. Place your slipknot on one of your wide toothed comb's teeth.

Step 3. Wrap your yarn around a number of teeth of your choice, this depends on your desired width. Then, place your yarn over the loops you just created.

Step 4. Pull your loops over the yarn.

Step 5. Now, wrap your yarn around the teeth as you did in the first half of step 3.
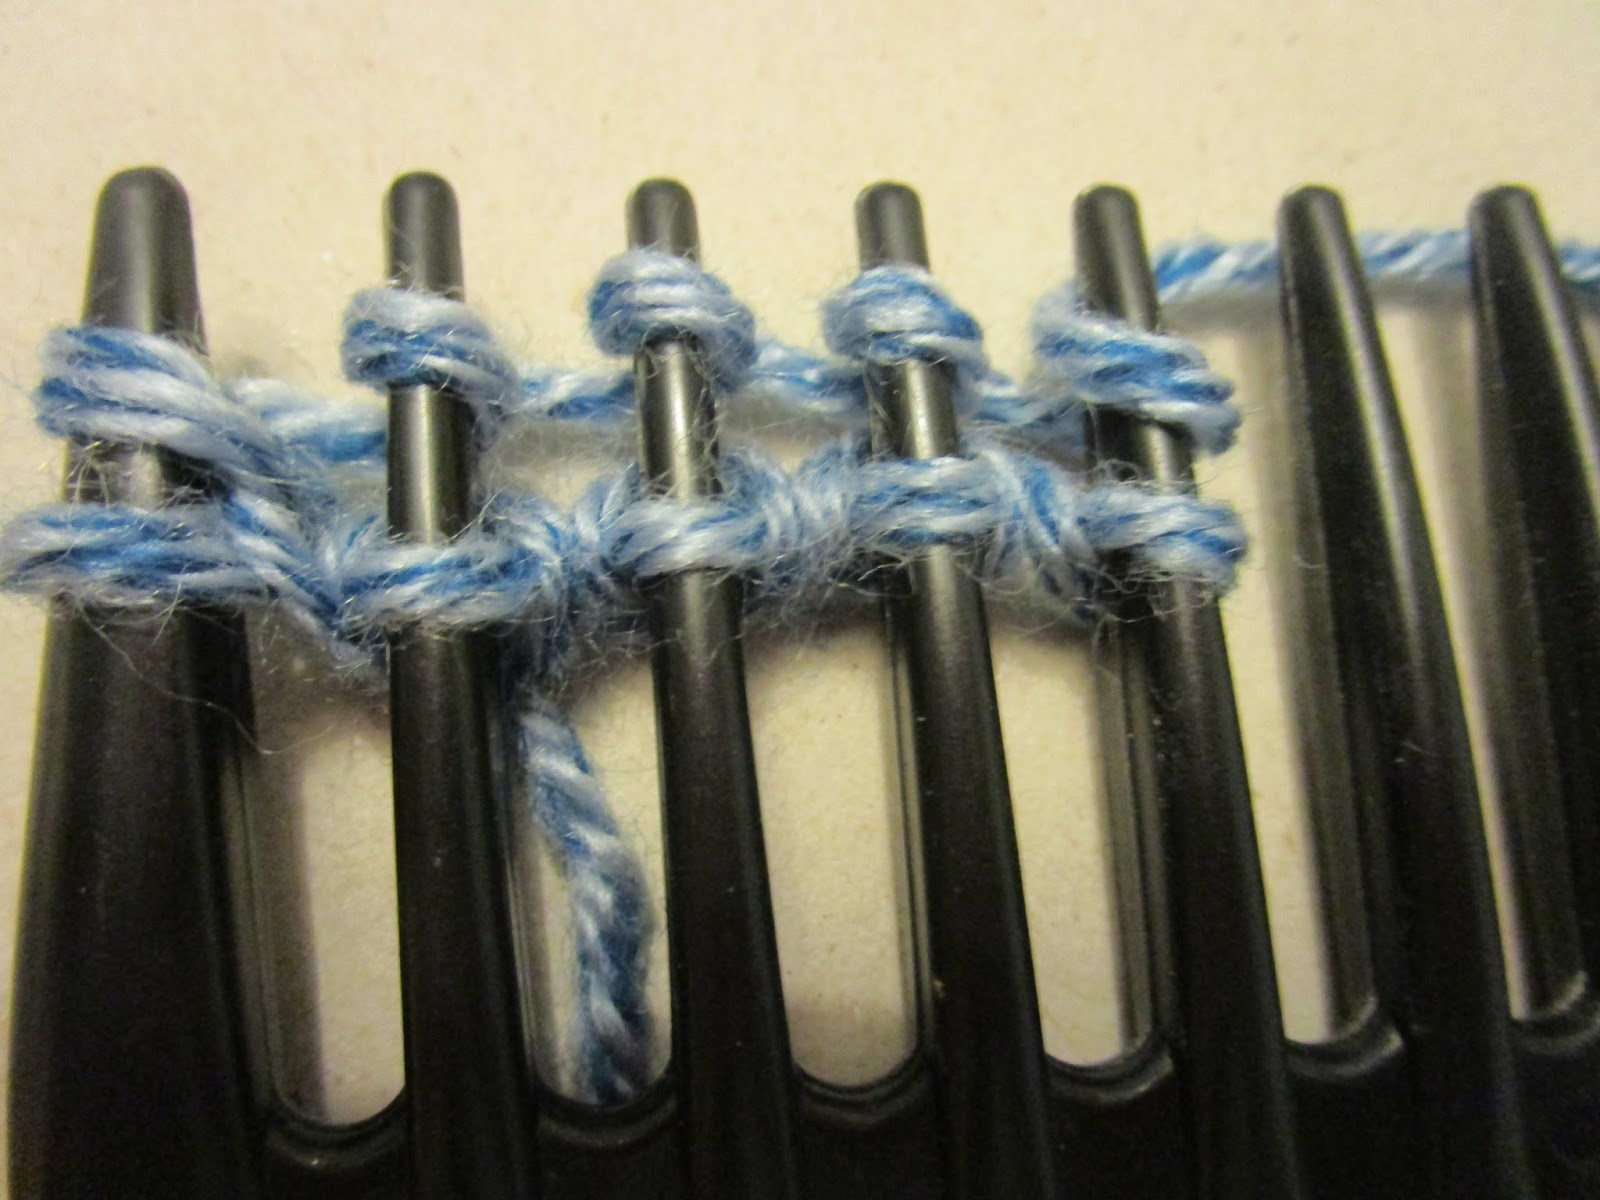
Step 6. Pull the bottom loops over the top loops and continue repeating steps 3-6 until you achieve your desired length.


Step 7. One you've achieved your desired length, cut your yarn, leaving 6-8 centimeters of yarn to finish your project with.
Step 8. String your yarn through each loop before pulling your creation off your comb.


Tuesday, July 19, 2016
DIY Healthy Watermelon Popsicle Recipe
Hey everybody, it's Bear!
I hope you are all enjoying your summer vacation! However, as we all know, summer can be excruciatingly hot. Popsicles are a common way to cool down during the summer, they are sweet and tasty and seem to be just the right temperature when consumed during the summer. The summer's vicious heat paired with the popsicle's delicious iciness; it's a match made in heaven!
However, the majority of the popsicles you can find in stores are filled to the brim with potentially carcinogenic food colourings and preservatives! Despite being low in calories, I would recommend consuming them in moderation. "But Bear; What else can I eat to cool myself down during the summer?", you may ask, to which I will answer: popsicles! You must be exceedingly perplexed by now, allow me to explain: No, I am not giving you an answer that is contradictory to my previous statement (well, I guess I am on some levels), as today I will show you how to create your own popsicles using fruit juice! I would recommend consuming these...well...as often as you'd like to!
Here's what you'll need:
- Water
- Watermelon (you can use any fruit of your choice Hrt)
- Optional: Honey/Maple syrup/Any sweetener of your choice
- Popsicle molds
Step 1. Place a piece of watermelon in a bowl.

Step 2. Crush your watermelon using a fork. I personally believe listening to One Way by Blondie makes this even more enjoyable *die watermelon, die*

Step 3. Add an appropriate quantity of water to the bowl.

Step 4. Pour your mixture into a glass, this will make pouring it into your popsicle molds much easier.

Step 5. Pour your mixture into your popsicle molds.

Step 6. Place your popsicles in the freezer to set for 2-8 hours.
Step 7. Carefully remove your popsicles from the molds.

Tuesday, July 5, 2016
The Hulk's Favourite Face Mask - DIY Green Clay Face Pack
Hey, it's Bear!
Here's what you'll need:
As some of you may know, clay masks are excellent at absorbing excessive sebum as well as minimizing large pores, however many of them can be too drying for people with dry skin such as myself.
However, green clay is one of the few types of clay that are suitable for dry or sensitive skin as well as oily skin, as despite drawing out excessive sebum, it won't dry out your skin. It's also non comedogenic (won't cause acne) and won't irritate your skin.
Green clay is also well known for it's powerful anti inflammatory properties as well as it's unique mineral composition consisting of dolomite, magnesium, silica, phosphorus, manganese, copper, calcium and zinc, can help remove impurities from your skin as well as help with acne.
How to make a Green Clay Face Pack
Here's what you'll need:
- Natural green clay
- Green tea
Step 1. Place 1-3 teaspoons of green clay in a glass of cold green tea. Let this sit for 1-2 hours.
Step 2. After 1-2 hours, you should be able to scoop out the clay from the bottom of the glass using your fingers.
Step 3. After cleansing your face, spread an even layer of clay on your face. Leave it on for 10 - 15 minutes.
Step 4. Enjoy being The Hulk for 10 - 15 minutes.

Step 5. Rinse off the clay pack with warm water, followed by cold water (to close your pores).
Apply toner and moisturizer.
Expect soft, clean, smooth skin the following day! ❤️ Your skin will also be exceedingly moisturized, due to the fact that moisturizer tends to fully absorb into your skin when it isn't blocked by your skin's sebum. This can be highly beneficial for dry skin. This face pack can be used once a week, but can also be used twice a week as a blackhead mask. Don't forget to use moisturizing face masks as well! ❤️❤️❤️
Step 2. After 1-2 hours, you should be able to scoop out the clay from the bottom of the glass using your fingers.
Step 3. After cleansing your face, spread an even layer of clay on your face. Leave it on for 10 - 15 minutes.
Step 4. Enjoy being The Hulk for 10 - 15 minutes.
Step 5. Rinse off the clay pack with warm water, followed by cold water (to close your pores).
Apply toner and moisturizer.
Expect soft, clean, smooth skin the following day! ❤️ Your skin will also be exceedingly moisturized, due to the fact that moisturizer tends to fully absorb into your skin when it isn't blocked by your skin's sebum. This can be highly beneficial for dry skin. This face pack can be used once a week, but can also be used twice a week as a blackhead mask. Don't forget to use moisturizing face masks as well! ❤️❤️❤️
Thursday, June 23, 2016
DIY Banana Hair Mask for Shiny, Healthy Hair

Hello everybody, this is Bear! Today, I will be showing you how to make this deep-conditioning banana hair mask! This hair mask excels at repairing dry, dull, damaged hair and is inexpensive to make as well!
Here's what you'll need:
- 1 Banana
- Vitamin E capsules
- Almond oil
- Raw, organic honey
- A blender or food processor
Step 1. Place your 'ingredients' in your blender or food processor.


Lastly, add in one teaspoon of raw honey.

Step 2. Puree your ingredients in your food processor or blender. This step is crucial due to the fact that (speaking from experience) getting small banana chunks isn't fun.

Step 3. Brush your hair in order to remove any tangles before applying the mask.

You're done! ❤️❤️❤️

Saturday, June 11, 2016
🐻 Summer iBuybeauti Haul 🐻
Introduction
Hey guys! It's Bear!
As conveyed in my title ( my oh-so-original title (NOT)) I recently placed an iBuybeauti order and it finally arrived! I have already opened the box and taken out all the products, however, if you'd like me to take pictures of the products whilst they are still in the box, be sure to let me know as I will do that next time if that's what you'd prefer!
❤️ What I Bought ❤️

Etude House Modelling Pack (Aloe Smoothie)

Etude House Modelling Pack (Aloe Smoothie)
I've always wanted to try out a modelling pack since seeing a Korean actress on Get It Beauty use it as part of her skincare routine. However, most of the modelling packs I've seen online so far have been rather expensive, so when I discovered this Etude House modelling pack on the ibuybeauti website, I figured I had to try it out! I even bought two, just in case it's good! I will definitely post a review on it, in the future!

 I just needed a new sunscreen for everyday use and was interested in this one's 'dust protecting' concept.... That's about it....
 I've heard a lot of excellent reviews on Aritaum's 'full cover' line and decided to try out this cream concealer! I'll be sure to post a review on it if I enjoy it!
 I've already reviewed this product! However, as I mentioned in my review, this was the shade I initially intended to purchase! However, it was sold out at the time! I placed my order immediately when I saw it had been restocked!
Tonymoly Delight Mascara #3 Clear Circle
 I personally prefer clear mascaras, due to the fact that they are easier to remove and aren't noticable if they smudge throughout the day (unlike black mascaras, they usually wear off throughout the day, and when they do, well... it isn't pretty)


 I needed a new cleanser..... That's about it....
I will be sure to keep you updated, so please look out for future reviews of the products mentioned in this post! Thank you for taking your time to read my post!
Etude House Nail Polish in 'Magical Blending'
I've tried Etude nail polishes before and have always been pleased with the application as well as the colour payoff! I don't have that much to say about this product... It's a pretty purple holographic nail polish I'm looking forward to wear...
Etude House Sunprise Dust Block Sunscreen
Aritaum Full Cover Cream Concealer 'Light Beige'
Aritaum 'Ginger Sugar' Tint Lip Balm #1 Flame Rose
Tonymoly Delight Mascara #3 Clear Circle
Innisfree 'Olive Real Skin' Toner
I've been in desperate need of a new toner and I personally prefer the texture of Korean toners, as they are easier to apply with your hands without wasting product! In case any of you didn't know, unlike western toners, Korean toners focus on preparing your skin for the next product rather than removing additional sebum. This is why Korean toners tend to be more moisturizing as well as why I prefer them!
Innisfree Sheet Masks in 'Bamboo' and 'Açai Berry'
These are my favourite sheet masks! They are exceedingly moisturizing and smell so nice!
Innisfree 'Blueberry Rebalancing' 5.5 Cleanser
I will be sure to keep you updated, so please look out for future reviews of the products mentioned in this post! Thank you for taking your time to read my post!
Sunday, May 29, 2016
Aritaum 'Ginger Sugar' Tint Lip Balm #3 Dreaming Coral REVIEW
Introduction
Hello everybody, it's Bear! Today I will be reviewing a lip product! I will be reviewing Aritaum's 'Ginger Sugar' Tint Lip Balm. This is my very first review as well as my first post!I initially wanted to purchase the shade 'Flame Rose'/#1, as part of my ibuybeauti order but it was out of stock at the time and I wasn't willing to wait the two weeks it would take for it to restock as I was running out of my favourite sunscreen and needed to repurchase it as soon as possible! (It also probably had something to do with the fact that I am a rather impatient person but let's just ignore that for now)
Anyways, I settled upon the shade 'Dreaming Coral' as I figured I was in need of a coral lip colour for the upcoming summer.
According to the packaging this product is "A lip balm that moisturizes your dry chapped lips to create a smooth lip" It doesn't mention anything about the fact that the product is a tinted lip balm so I will base my judgement of the colour itself on this image I found on ibuybeauti:

"Aritaum Ginger Sugar Tint Lip Balm | Ibuybeauti". ibuybeauti
First Impressions
The packaging is very simple and cute! I adore the contrast between the brown and coral colour of the packaging! It isn't much larger than your average lip balm. However, once I opened it and smelled it, I fell in love with its soft ginger scent:
It smells just like the ginger candies I used to eat as a child

Colour Payoff:

As you can see the colour is relatively sheer and natural which makes this product very wearable and convenient for everyday use! I can highly recommend this shade as a natural everyday lip colour for teenagers such as myself!
Overall 🐻
I would highly recommend this product to anyone who wants a natural lip colour for everyday use, However, I wouldn't advise you to get it if you are looking for intense colour payoff as this is a tinted lip balm rather than a lipstick. As for the promised moisturizing properties I can say that this product is more moisturizing than your average lipstick, however I wouldn't recommend using this to replace your lip balm if you have extremely chapped lips.
Overall I am exceedingly pleased with this product and will surely look into the other shades. I would additionally repurchase this shade as well, as I am very pleased with the colour payoff it does give off!
My Rating:
💖💖💖💖❤️
Subscribe to:
Posts (Atom)